Here we are again Deesciples. Another model and another tutorial for your consumption! I am here to FEED YOU CONTENT!
Today, we are going to cover how to paint jeans. I admit, I am actually surprised how little is out there on how to paint such a common piece of clothing in today’s society. It might be due to the fact that the things we paint are usually crawling out of a Tolkein novel or flying around in space to find places to scream without anyone being able to hear them. If I was in those situations, I know I would want to be doing it in a comfy pair of Levis as my throat goes raw from screaming as the unimaginable eldrich horror occupied my body like a meatsuit. I even know what the first thing he would say is too.
“Man, these jeans are real comfy.”
Something everyone is always saying is that Hulk LOVES a comfortable pair of dungeroos! I am here to prove it and help you put your own large, green man into a comfortable pair of Wranglers.
First, as always, we need a model.
I might be a little biased, but I recommend that you grab this model and anything else you need for MCP from Bearded Dragon Games. Make sure you use the code PCME10 at checkout to get a huge discount. Full disclosure, the store is actually one of my favorites stores on da earf and the guy who works there is a fantastic man and also a fantastic lover.

Our friend Hulk was primed with Monument Hobbies Black Primer from an airbrush. I love this stuff and it helps if you don’t like using aerosol cans to prime your models.
I really love this sculpt in so many ways other than the hair. The sense of movement and attention to details in the body and base are VERY impressive. If someone sees this guy on a table while walking by a MCP table they are going to have to stop and look at it. I really think that AMG have stepped up their technical skills when it comes to their model sculpting and it’s always fun to see what comes out of their studio.
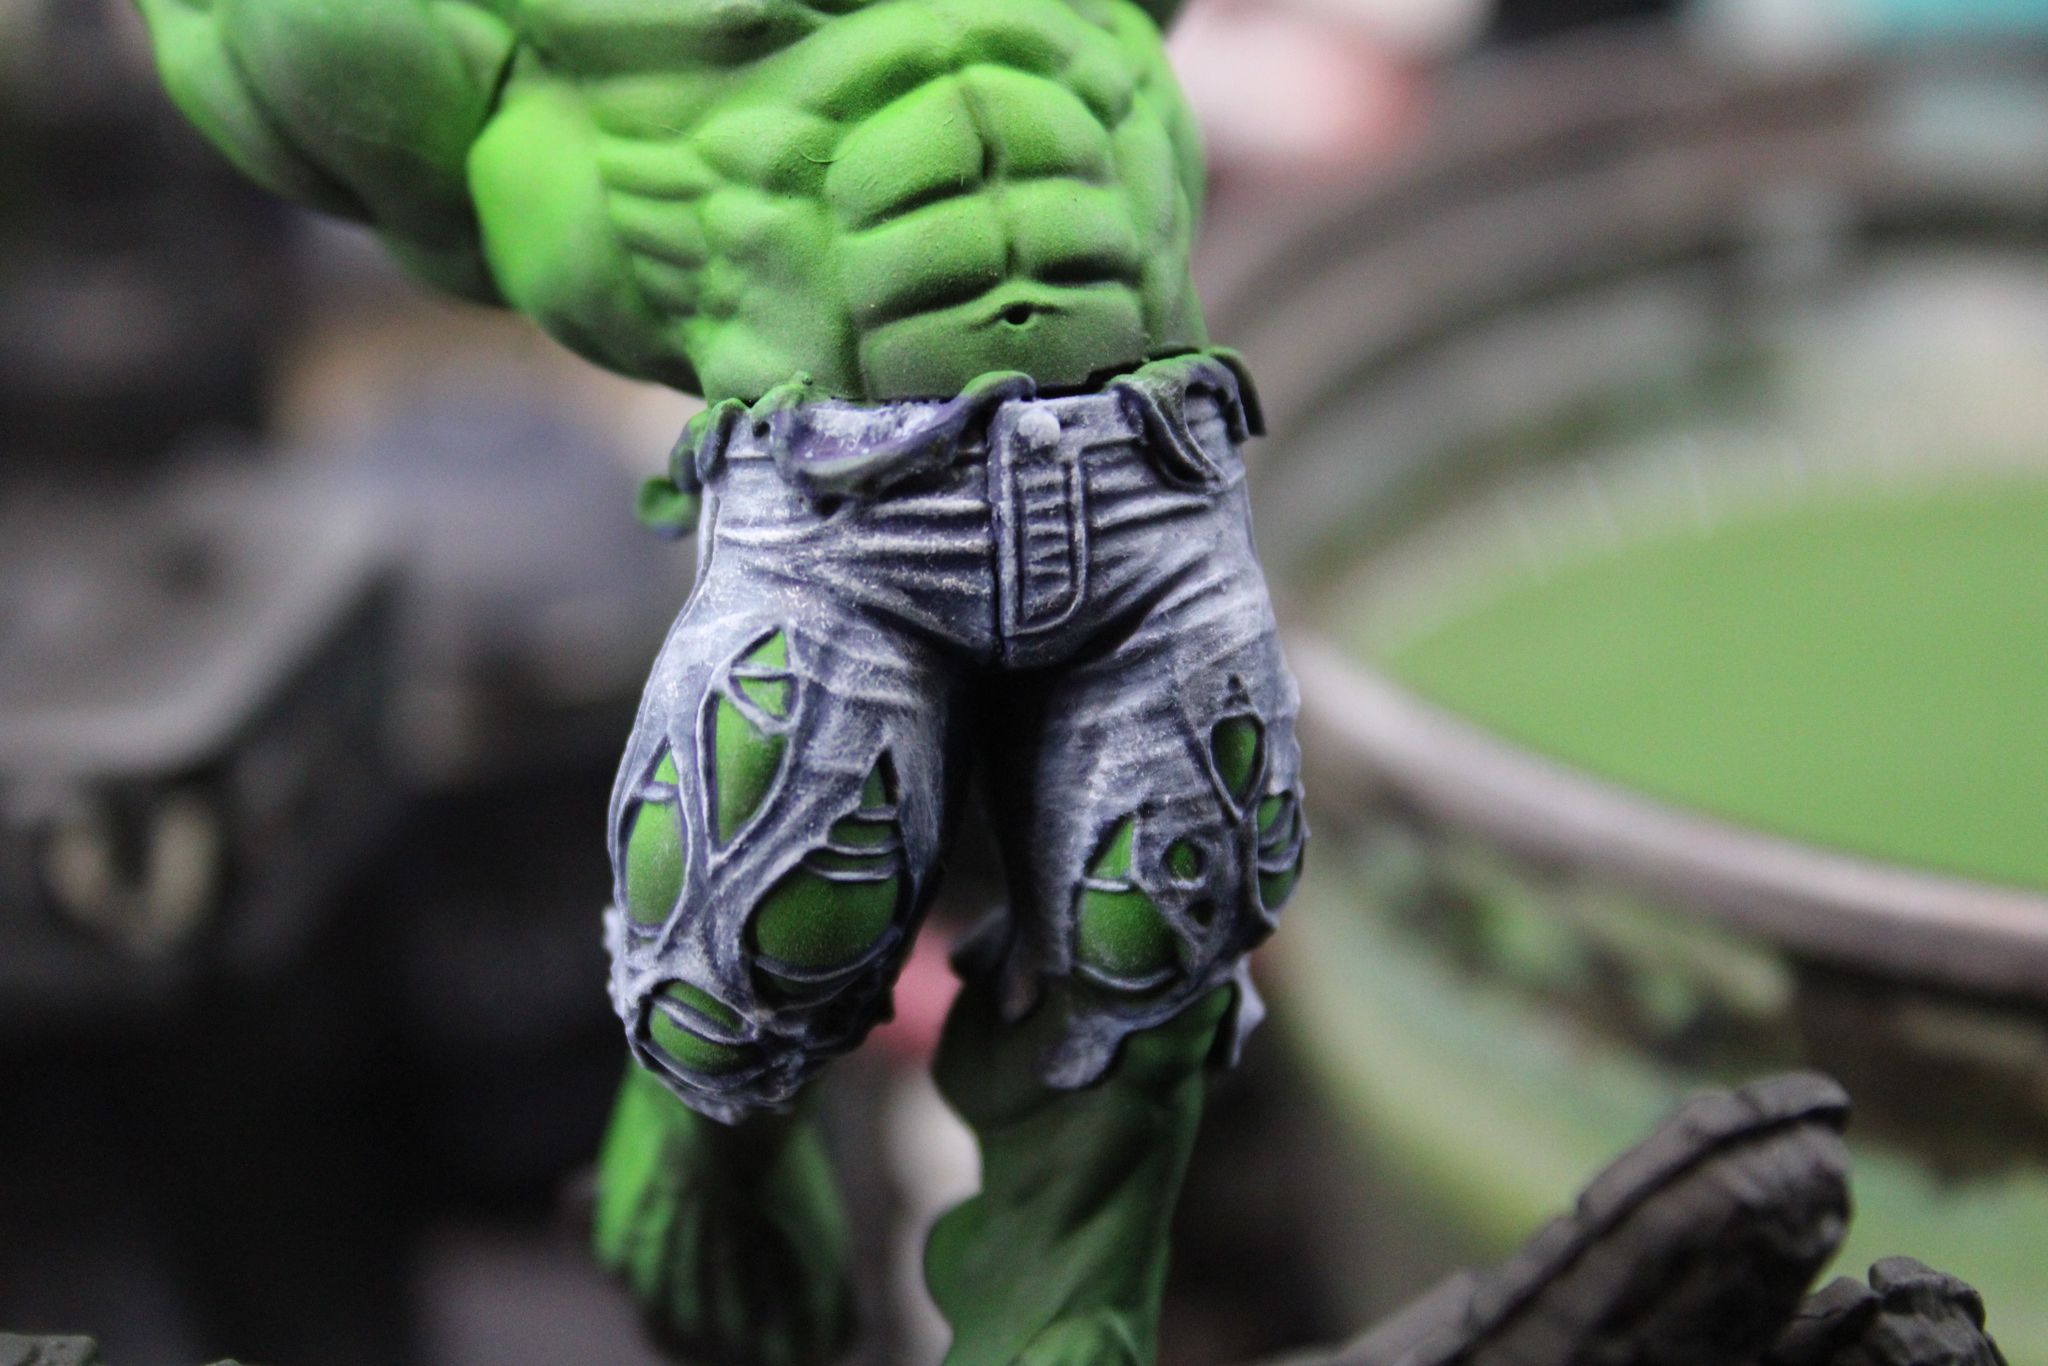
The person I was painting this model for wanted more regular jeans, and man oh man, was he not prepared for the level of detail on this man’s pantaloons. I adore denim in all of its forms and shades, and I made sure I knew how to paint it very early in my painting career. I learned how to paint denim mostly on Malifaux models since that game had a very heavy western theme, and denim just resonates with “Western” in my brain.
When it comes to painting models though, my usual rule of starting from the center and working out applies. So, lets get the skin out of the way. Due to his size, I used an airbrush to speed up the process. I used the exact same colors I used for my Painting Green Without Fear article, but the quick version is:
PA Bright Yellow Green + PA Transparent White
Don’t forget to use PROFESSIONALCASUAL at checkout if you grab any of these paints from the website for a sweet, sweet, delicious discount!
I would later go in and try to black line the model in the deeper areas, but I didn’t like how it came out. The transparent black didn’t work quiet how I wanted it to for lining. In the end I went back in with transparent black with an airbrush to help with the gradients. This helped me get the smooth blends I was after.


After the skin was colored in I knew I could start working on the other parts of the model without making it more difficult for me later on.. Now we may begin painting the jeans. Also, as a quick aside.
JEEEEEEEEEEEEEEEEEEEEEEEEEEEAAAAAAAAAAAAAAAAAAAAAAANNNNNNNNNNNNNNNNNNNNN!!!
Thankfully, jeans can come in so many different styles that what we are about to go over can be a great baseline for any kind of jean style you can think of. In a strange way, you actually CAN’T paint jeans wrong if you are even slightly trying. It’s such a forgiving material.
Once, I even yelled at my own jeans and said alot of things that can’t be typed in a PG-rated painting article, but when I came back to say I was sorry my jeans had already forgiven me for what I said.
Honestly, you could trip and knock all of your paints onto your model and the jeans will probably come out better than anything else you have ever painted. Even a quick search online gave me a huge variety of colors and shades for blue and black jeans.

Here is a quick paint list.
Vallejo (V) Dark Prussian Blue
I started by using a basecoat of Vallejo (V) Dark Prussian Blue and carefully applyed it all over the jeans. Make sure you also get the strings. These are not going to stay very blue, but the blue undertone is going to make the highlighting we do much more convincing.

the butt to get, but it is well worth the effort if you can do it cleanly.
The fun thing with painting jeans is that most jeans have a very rough texture when compared to something like silk or cotton. This means that by doing a little bit of work to give it that more “beat up” type of texture it becomes a great way to really add something extra to the model. I used a very old, beaten up GW brush that was probably Queen Elizabeth of England’s favorite paint brush at some point and have learned to appreciate the frayed end of the brush. It is the tool of choice.
Gravedigger Denim is THE color for jeans. I respect P3 for their paints, but their products can be a little bit of a pain in the butt to get a hold of. This is the one product I would say is worth the effort to get your hands onto.
Next, I mixed a 25:75 Dark Prussian Blue to Gravedigger Denim to start working up the colors. I took my brush and thought about where the texture would manifest on this model. My boy Bruce has some THIGHS, and they would be straining the denim material outwards due to his rapid growth. After applying a little application of clothes physics, I knew the strain lines would be more lateral than vertical.
Trust me, my dad works in science.
This means when you are sketching in your colors from this point forward you want to drag your paint left and right while you are highlighting. This gives the impression that the model under the jeans is dynamically affecting the material of the jeans. This is going to instantly add depth to the model. So, after you put paint on the brush and wipe off the excess paint, dab and drag the paint left or right until you are happy with how it looks. This might start to feel like you are drybrushing, and I admit it is very similar. This technique is going to be more important the closer to white you get so it’s great to practice at this stage so that you come armed with experience at the end.


At this point, I started using pure Gravedigger Denim and just started doing the exact same thing to the upper points of the jeans. Tops of folds and where the muscles would be pushing against the denim from underneath. This was the case mostly on the back of the legs.


Next, we are going to start adding some PA Bold Titanium White. This is the best white in the bizz, and I will never touch another pure white paint again since I found this stuff. Now, you want to mix just a very slight amount to your current paint mix.


This is also an excellent point to make sure you really start to brighten the ripped parts near his calves. The ripped material would be very white since denim itself is white and tears will effect the denim coloring.


A very, very important part of painting is to make sure you have animals nearby that can put their loose hair into your paint mixes and make sure movement is very inconvenient. Creates the full authentic Dr. D experience.

Next, you probably guessed it, let’s add some white to the mix and make it REALLY white. The key here is that you don’t want to use pure white at the end of a paint job since it needs at least a little of the previous color to keep it attached to the model’s paint job. Otherwise it will never look quiet right.

This color is going to be placed on the areas with the most stress or where the material itself is ripped. At this point you can bring out a brush that might not have gone through two world wars. You want to stipple this color onto the tops of folds going towards your light source, and hit the edges of the model.


You will see it in the finished shots, but I went back with a little very watered-down Dark Prussian Blue and put some shading back into the areas that need some definition. This would be right below the gluteal fold (butt check) and in the inner thighs. The good news is that glazing in the shading after will actually make some of your white muscle straining parts look even better!


And that’s another tutorial down lady and gentlemen. This model took a little longer than I was expecting, but there is a lot you can do to make this model really sing. I was not able to do all of the tutorialing that I wanted to do in this article so the next one should be pretty close behind this one.
Make sure you tip your waitresses and bartenders on the way out, and use the code PROFESSIONALCASUAL if you grab anything from our best pals at Monument Hobbies. Like seriously, when you do that, it really helps us out and we love you for it.
TAKE IT EASY GUYS AND I LOVE YOU!
Dr. D out.


Leave a Reply