Well, hello there fellow DDevils. Its time to talk about the second half of the fancy Emma I painted for The Worth. This is a competition put on by the lovely people at AMG for their game, Marvel Crisis Protocol. Maybe you heard of it.
A great man once said, “behind every great, fancy painting award is a man with some kind of sleeping disorder desperately trying to prove he is cool to a bunch of other nerds.” I am not 100% sure on who said that, but I have a feeling it was Patton.
In the previous article we talked about building the model and the base layout. This article we are going to talk about the paint job and then how I did the mindbeam special effect. This model took alot of work, but it clearly illustrates that anyone can do this kind of stuff. It really is just taking it one step at a time.

We left off with the base being “painted” and Emma being put on another base so that we could work on the base without messing anything up with some airbrushing. Lets focus in on Emma first.

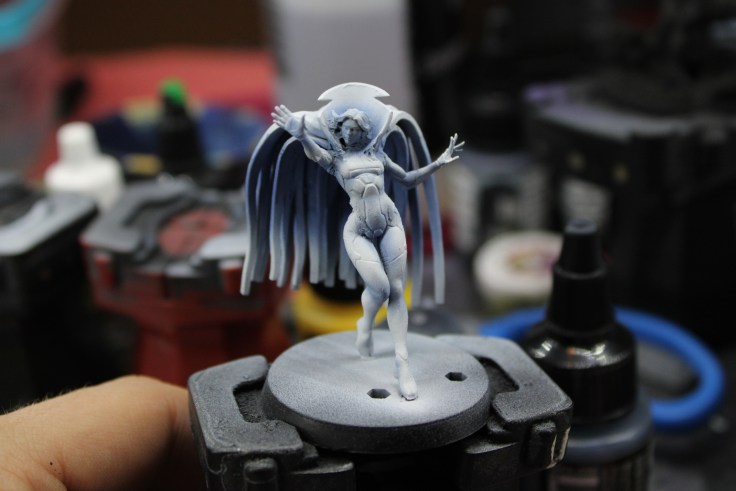
I based her with some good ‘ol fashioned Monument Hobbies Black Primer before I sprayed her with some (V) Pale Grey Blue. This is my go to base for painting white, and it has gotten me through many years of painting. I will go into more detail on this is a article coming out very soon, but know that this color is a real trendsetter when it comes to painting white colors. I used an airbrush since time was of the essence and since I needed the smoothest blends possible. They had to be smooth as (Bostonian Accent) buttah. I even tested a little bit of the shading before I took the shot with some (PP) Exile Blue. You can see it starting to work its magic underneath the cape in the picture below.
I have to admit that Exile Blue is one of those High School loves that I have never been able to quit. Whenever I think about shading white I will wake up in the middle of the night, grab my phone, and just take a nice long look at the memories we have shared together. Some might find this very strange since I am a human and it is a non-sentient pot of paint, but we all find love in unusual places.


After I was pleased with the basecoat and knew that the shading color is going to do what I want, I start airbrushing in the shade with the Exile Blue. I look down at the model and think about what direction I want the light source to be coming from. I am thinking I want the light to be coming from the model’s right side and slightly in front of her. This way it highlights the parts that I think will be the most interesting, but still give me some leeway on creating some contrast.


Next, I would airbrush in some of (MH) Bold Titanium White, which I believe remains the best white in the business. This stuff just gets the job done and I have given up on using anything else. I hit all the highpoints and remain very conscious of the blue shading to make sure I don’t let the white overtake all the hard work I just did. We want lots of contrast since this model is pretty much one one big color.


I played with the (PP) Exile Blue and the MH Bold Titanium White until I didn’t wanna do that no more. I knew that I would most likely come back and mess with it even more later since I would be able to take the entire model into perspective. At this point I was guessing with my brainmeat where the light would be hitting this model based on my ideas.
At this point, I was finishing stuff quick and fast so I didn’t get lots of individual photos, but I painted the skin like I outlaid in my previous skin painting article. I painted the hair the hair blonde, and I used MH Jade and turquoise colors to paint her lipstick, eyes, and Sinister headgem thing. I recently started using these colors and I gotta say they are crazy saturated and it felt like love at first brush lick.
I was getting worried that the white was ACTUALLY overwhelming and I was scared that people were gonna laugh at me. I knew I wanted to put something on her suit to break up the white and give it some variety. I decided to paint the little side pad, bicep armor, and the hip armor transition parts in black with my Cool Black technique. My gap filling areas lacked the texture that I think I really needed to make these sing (This will come up later), but I do think it helped make the white even better by making the entire thing less monotonous to look at.


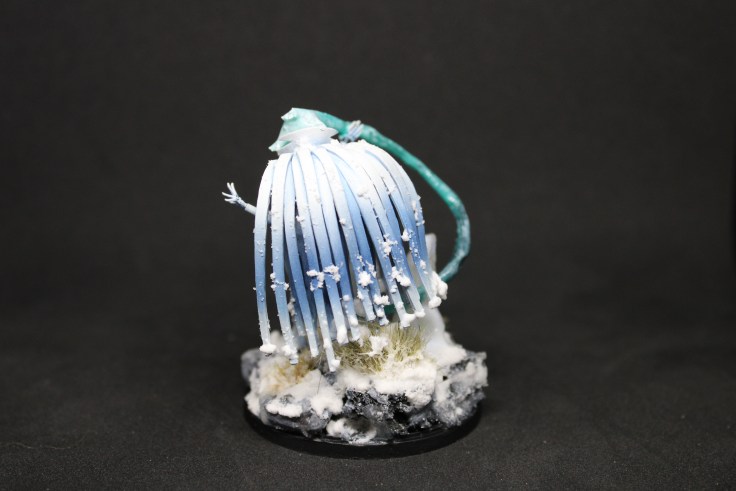
Next, I covered the base with some snow and used some heavy gloss gel to make some melted ice or icicles around the base. This would help drive the story of her walking around in a literal winter wonderland.
At this point, I knew this model was top notch, but I needed to give it one more thing in order to really wow the judges if I wanted any chance of winning. I knew The Worthy was going to be bringing the big boys from all over the EARF. I needed to really pull out the stops.
I decided to try and emulate something like this from the Wolverine and The X-Men show.

My friend from The Painting Gallery with No Name, Jon BW, informed me that I should use UV resin in order to do something along these lines, and I knew I was going to need to do something VERY fancy to win. I got some clear nylon wires to give it structure and ordered some resin. My deadline was coming quick so I had to make sure I created the effect quickly!
When it showed up I cut the nylon wires and glued it into a winding shape so that I could wrap it around the icicles on the base. It took ALOT of work and imagining how it was going to turn out. I then slowly covered the string in the UV resin and hit it periodically as I worked down the string with the UV light. To my amazement, the resin dried INSTANTLY and did exactly what I was hoping. Now this is podracing!
I will warn anyone interested in doing this that the UV resin is VERY MESSY AND GROSS TO WORK WITH.


So, I knew a clear resin beam thing wouldn’t be very “cash money” to the judges. I had to get creative and add some Sinister to it. My thinking was I would use the jade colors every time something sinister would come up. So I pulled out the same colors as her lipstick and headgem and mixed it with some glazing medium. It took quiet a few layers but I covered the whole midbeam in that blue/green goodness. In certain spots I even let some of the clear resin shine through so that it look like it was running with seams of clearness to it.


The entire mindbeam being a single color would make sense lore-wise, but it didn’t click for me. I mixed some black in with MH Jade and started putting in some visual interest. The entire thing was slowly drying so I knew I could get some wet blending done to make it look more seamless. While I was at it I realized that I would need to put some highlights in as well. I used MH Transparent White to try and bring the highlights up while allowing the MH Jade to shine through underneath.


And there you have it lady and gentlemen! That is a finished Emma Frost in a Mr. Sinister get up. I brought it to Adepticon with a stupid little smile on my face and gave my model to the man at the counter. He put it into the display cabinet where it would later be put into the disqualified part of the cabinet due to a misunderstanding that was thankfully fixed.
That Sunday at Adepticon I walked back to the AMG area to see if I had placed and to get ready for my Shatterpoint demo! I was sad, but totally ok with, not placing in the Singles category. I obviously knew that the best of the best had showed up, and this was my first REAL model painting competition. I was happy that I had met my goal of at least submitting a model and having a very sick model that I could game with. (More on this in the future for sure.)


I later asked Dallas, the head judge, what I could have done better and thankfully I was in full agreement with everything he said except for one.
I as told:
- The mindbeam resin effect was too clunky
- The base was too cluttered
- The black needed to be highlighted more.
I agree that the mindbeam was too clunky. I knew this might be the case since it was my first time, but I really enjoyed trying it out. I love my bases chunky since I like that kind of storytelling, but I did see everyone else going more on the terrain-lite side of their submissions. And the black was a victim of the lack of real texture on the gap filled areas that scared me to keep pushing the highlighting up. These were all excellent tips for next years attempt at placing.
He did give me a compliment on my white though, which is amazing given that the entire model was going to live or die on that white. So I managed to give myself a pat on the back in that regard. I will say that I get what he is saying for the cluttered base, and I was obviously the only person in that competition that thought throwing MOAR stuff on the base was a good idea, but honestly that is one of my favorite parts of model hobbying. This is a great lesson on learning that specific things need to be done for different situations. It doesn’t make anything anyone does bad, but it does mean you need to apply them intelligently.
Overall I am very happy with how it all turned out, and it was fun to relive the entire process while writing this article. I will for sure attempt to put in some entries for next year’s The Worthy and maybe I can bring home one of the colored pieces of metal so I can tell all of my imaginary family members about the time I spent alot of time painting a model so I could be a cool nerd.
Man, then I will be really cool.
But UNTIL THEN, that’s it for this one guys. Make sure you use the code PROFESSIONALCASUAL if you purchase any paints from Monument Hobbies. I know that I am not going to finally be able to save up for new pair of shoes with all the money I have saved from that code already. Have a lovely day and I am excited to see where we go in the next one!


Leave a Reply